
Overview
Some electricity retailers now offer a free or heavily discounted three-hour window of grid power in the middle of the day. If you have a compatible Deye hybrid inverter, you can manually set its front-panel Time of Use (TOU) schedule so the battery charges from the grid during that window. This guide uses 11:00–14:00 as the example – replace it with the exact window stated on your own retail electricity plan.
Screens can differ slightly between Deye models and firmware versions. If yours doesn’t match the photo exactly, the settings are usually in the same place under a slightly different name – and you can always contact our support team.
Before you change anything – please read
This is a manual, one-way schedule, not a live link to your tariff. Programming the inverter simply sets it to charge from the grid on a fixed daily schedule that you choose to line up with your retailer’s offer window. There is no communication between your retailer’s tariff and the inverter – it has no way of knowing what your retail plan actually charges at any given time.
RPC cannot be responsible for the outcome of manual changes. Because the inverter and your retail tariff are not connected, RPC is not responsible for outcomes arising from manually programmed settings – including if the window you’ve set doesn’t match your plan, your retailer changes its offer, or the change affects your bill, battery health or system performance in a way you didn’t intend.
Daylight saving is a known open issue. The inverter’s clock currently adjusts automatically for daylight saving, but retailers structure their tariff windows on their own time basis, which may not shift the same way at the changeover. RPC is still investigating this. Check your programmed times still line up with your retail offer after any daylight-saving change.
This is a temporary fix, not a permanent solution. RPC is working with Deye on a firmware update and closer retailer integration, so a future inverter can automatically follow your actual retail tariff. Manual TOU programming is an interim way to access the window until that integration is available.
This guide is retailer-agnostic – it only covers programming the inverter itself. It is your responsibility to check your own retailer’s terms and confirm the exact free or discounted period before entering it. It will not be 11:00–14:00 for every retailer or every customer.
Not confident making this change, or want RPC to implement, verify and monitor it for you? This is available as a paid technical support service – contact RPC for a quote.
Before you start – confirm two things
- Your retailer’s actual free or discounted window. Check your own retail plan – it may not be exactly 11:00–14:00. Use your plan’s stated times in place of the example below.
- Your grid circuit-breaker rating. The grid charge power you set must not exceed 80% of this rating. Check your switchboard, or ask your installer or electrician if you’re not sure.
Reference: the front-panel Time Of Use screen
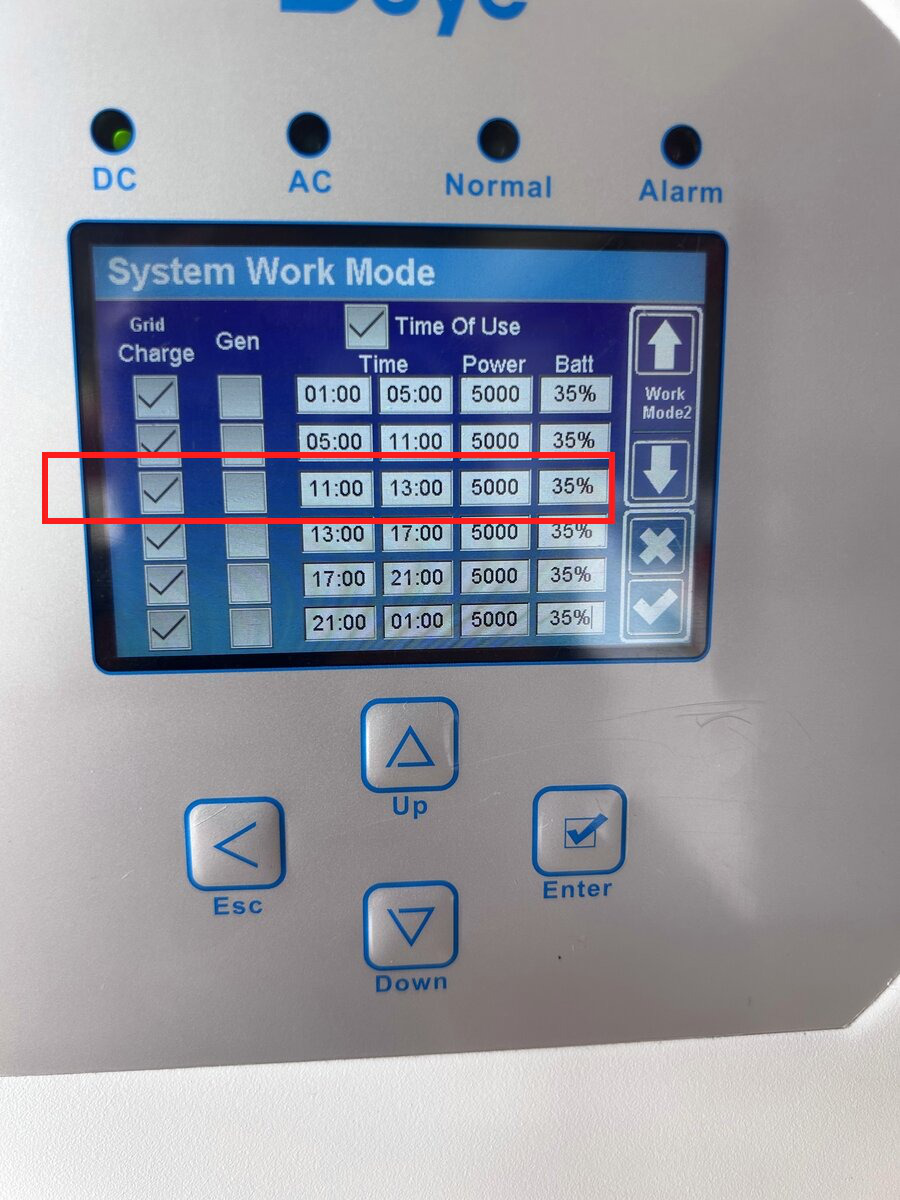
Go to System Work Mode > Time Of Use on the inverter’s front-panel display. The example below is set to self-consumption, with a minimum battery SOC from grid of 35% in all six periods. You only edit one line – the 11:00–13:00 row highlighted in red. Extending its end time automatically shifts the start of the next line to match, so there is no gap or overlap to fix manually.
Step-by-step: setting the 11:00–14:00 window
- On the inverter’s front panel, go to System Work Mode and confirm the Time Of Use checkbox at the top is ticked – this enables the schedule.
- Find the line that currently reads 11:00–13:00 (highlighted in the photo above), or whichever line matches the start of your retailer’s free-power window.
- On that one line, change the end time from 13:00 to 14:00, so the line now reads 11:00–14:00 (or your retailer’s actual window).
- The next line adjusts automatically – its start time moves to 14:00 to match, so the schedule stays continuous with no gaps or overlaps. You don’t need to edit it separately.
- On the 11:00–14:00 line, tick Grid Charge so the battery charges from the grid during this window.
- Set Power (charge power) on the 11:00–14:00 line to no more than 80% of your grid circuit-breaker rating – see the reference table below.
- Set Batt (target SOC) on the 11:00–14:00 line to 100%, so the system takes full advantage of the free grid power to charge the battery.
- Leave every other line as it is. Outside the free-power window the system reverts to its normal self-consumption settings (minimum battery SOC from grid 35% in this example), unchanged.
- Press Enter to confirm each field you’ve changed, then Esc to return to the main screen once all edits are saved.
- Before finishing, confirm the System Work Mode screen shows the new 11:00–14:00 line correctly, with Grid Charge ticked, Power and Batt set as above, and the next line automatically re-timed to start at 14:00.
Why we recommend 80% of your grid breaker rating
The Power figure you enter is the rate the inverter will draw continuously, at 100% duty cycle, for the entire three-hour window – not a brief peak or an average. Charging the battery at this level for that long is a significant, sustained load on the circuit, and RPC has seen it trip grid breakers on some installations. Setting charge power to no more than 80% of the breaker rating leaves headroom to avoid this.
If the grid breaker trips: reduce the Power setting on the 11:00–14:00 line and monitor the system over the following days to confirm it no longer trips before leaving it unattended.
Grid charge power reference
80% of circuit-breaker rating, single-phase 230 V. Use this as a guide only – confirm your actual breaker size and phase configuration before setting charge power. For three-phase systems, check with your installer.
| Grid breaker | 80% limit | Approx. charge power |
|---|---|---|
| 20 A | 16 A | ~3,680 W |
| 25 A | 20 A | ~4,600 W |
| 32 A | 25.6 A | ~5,880 W |
| 40 A | 32 A | ~7,360 W |
| 50 A | 40 A | ~9,200 W |
| 63 A | 50.4 A | ~11,590 W |
After you’ve made the change
Monitor the system for a few days to confirm it charges as expected during the window and behaves normally outside it. If your retailer’s window isn’t 11:00–14:00, repeat this process with your own times. Recheck the settings after any daylight-saving clock change.
When to contact us
If you’ve followed the steps and the system still isn’t charging during your window – or you’d rather RPC set it up and verify it for you – we’re here to help. Have your inverter model and a description of what you’ve already tried ready. You may also find Troubleshooting & Faults useful.
Phone: 02 6689 1430
Email: team@rpc.com.au
Opening hours: Monday – Friday, 8:30 am – 4:30 pm (AEST)
This guide is provided as general technical information only and does not constitute retail or financial advice.